Multiple Shots of a complete ACTION or Tell a STORY
This assignment is to take multiple shots of an action sequence with your camera in one stationary place. Then, using Photoshop we will combine all the photos in the sequence into one photo.
The camera should NOT move but... The subject should move across the frame
Step 1: You will need at least 7-10 photos in your sequence.
It is best to keep the camera stationary and not "pan" with your subject. Your subject also needs to move across the frame like in these examples.
The camera should NOT move but... The subject should move across the frame
Step 1: You will need at least 7-10 photos in your sequence.
It is best to keep the camera stationary and not "pan" with your subject. Your subject also needs to move across the frame like in these examples.
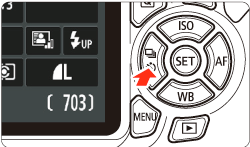
How to set your canon to continuous shooting mode so you can hold the button down and take multiple shots--------> |
|
|
2013-2023 Student Examples |
Some examples from the internet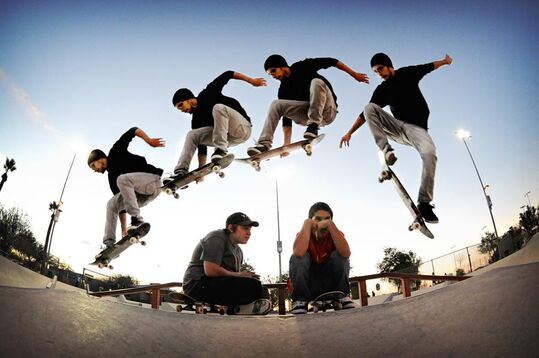
|
STEP 2: How to load all your photos into one Photoshop document...the easy way
Note: Before ANYTHING else, if you ever believe there is a better way to do something in software as sophisticated as Photoshop, you’re probably right, and the “way” most likely already exists. Google is your friend. All I had to do was search for something to the degree of, “Photoshop, Importing multiple files into one document”, and within minutes I was on my way.
1.) Open up Photoshop.
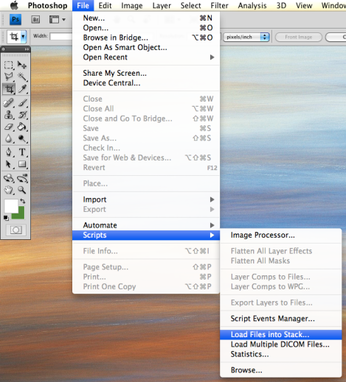
2.) At the top of your Photoshop menu, go to File > Scripts > Load Files into Stack…
3.) From there, you’re prompted with a new window that has a few options/actions.
It’s fairly straight forward, but as long as you know where all the images you want to import at once are, you’re pretty much set.
Hit Browse, then select/shift-click/highlight your group of images (whatever you prefer to do for selecting multiple files at once). The images will appear in the empty white space of the window as a list, by their respective file names. Go ahead and hit OK, and watch Photoshop do its magic.
Before long, you’ll have a single Photoshop document, with a layer for each image file you imported on top of one another.
1.) Open up Photoshop.
2.) At the top of your Photoshop menu, go to File > Scripts > Load Files into Stack…
3.) From there, you’re prompted with a new window that has a few options/actions.
It’s fairly straight forward, but as long as you know where all the images you want to import at once are, you’re pretty much set.
Hit Browse, then select/shift-click/highlight your group of images (whatever you prefer to do for selecting multiple files at once). The images will appear in the empty white space of the window as a list, by their respective file names. Go ahead and hit OK, and watch Photoshop do its magic.
Before long, you’ll have a single Photoshop document, with a layer for each image file you imported on top of one another.
|
CLICK THIS BUTTON!!!
|

STEP 3- reverse the order of the layers so that the bottom layer is the first photo in your sequence.
STEP 4- On each layer starting from the bottom(but not the bottom one).
Use Layer- Mask- Reveal all to paint out/in the layers below.
To set up for something like this you should probably take the photos with a tripod so the background stays exactly the same for all the photos you are going to work with.
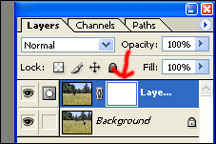
Ok, once you have the photos you want to splice together open in photoshop:
2. Add a Reveal All Layer Mask to the top photo, (Layer>Add Layer Mask>Reveal All). Your setup should look something like what’s shown above.
3. Then click on the Brush Tool and select a big sized soft paintbrush and make sure the opacity is set to 100%.
4. Then with the Layer Mask selected simply start painting with the color Black the areas where the subject is below on the background layer. That way the subject shows through the mask.
On the last step you may need to let more area show through then just the main subject so the blend looks realistic. For different photos, the process and amount of adjustment won’t be exactly the same. But with this technique you can make magazine sequence shots or unexplainable copied person pictures.
