Photo Badges-
We need to create a basic photo badge...
|
DOWNLOAD THIS TEMPLATE RIGHT HERE ------------->
|
| ||
The Optional Cool one...
|
|
Open Photoshop
Choose File- New
Name the Document “WHS BadgeFirstname_lastname”
Make the width 4 inches
Make the height 3 inches
Resolution 300 (cuz its for print, right?)
Click Ok
Bam, you’ve made a new blank document, ready for your cool creations!
You and your partner take portraits of each other.
Take out the SD memory card
Carefully place it in the back of the card reader… I SAID CAREFULLY!
Wait for it! Ok open folder to view files.
Find the pictures, look around, they are in there…
Drag them to your desktop.
Go to Photoshop
Choose file- open
Find your self-portrait file- click ok
Choose image- Levels- fix it up as you see fit
Choose image- image size
The document size looks weird at first- cameras make files based on pixel sizes, but I like to think of pictures in terms of real dimensions- like inches
So look at the document size- make it around the same size as our badge(4x3) but make sure it is at 300dpi!!
Now you have one blank document, and one picture of yourself, cool Mr. Brown, now what?
Make sure you are working on the picture of you. Choose the move tool and drag your picture into the blank document
Great, if its still too big choose Edit- transform-Scale
Scale it up or down-
LAYERS- Look at the right side of the screen you see that you have made different layers on a single document. Think of them like a bunch of pieces of paper on top of each other, you can even shuffle them around.
Photoshop files are like Onions.
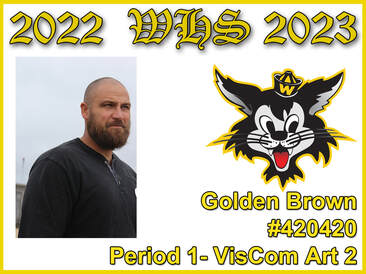
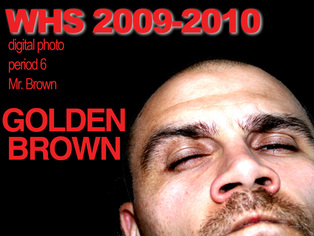
Choose the text tool, click on your document and type something- experiment with it. At the top there are several choices for your text such as Font, Size and Color. Your assignment is to make your own photo badge for taking pictures during class.
The requirements are:
4 inches wide by 3 inches high
Must have a photo of you at 300dpi(print quality)
Must say in legible text:
WHS (the school year you are in)
Digital Photography
Period (the period you are in)
Mr. Brown
Your First and Last name
Choose File- New
Name the Document “WHS BadgeFirstname_lastname”
Make the width 4 inches
Make the height 3 inches
Resolution 300 (cuz its for print, right?)
Click Ok
Bam, you’ve made a new blank document, ready for your cool creations!
You and your partner take portraits of each other.
Take out the SD memory card
Carefully place it in the back of the card reader… I SAID CAREFULLY!
Wait for it! Ok open folder to view files.
Find the pictures, look around, they are in there…
Drag them to your desktop.
Go to Photoshop
Choose file- open
Find your self-portrait file- click ok
Choose image- Levels- fix it up as you see fit
Choose image- image size
The document size looks weird at first- cameras make files based on pixel sizes, but I like to think of pictures in terms of real dimensions- like inches
So look at the document size- make it around the same size as our badge(4x3) but make sure it is at 300dpi!!
Now you have one blank document, and one picture of yourself, cool Mr. Brown, now what?
Make sure you are working on the picture of you. Choose the move tool and drag your picture into the blank document
Great, if its still too big choose Edit- transform-Scale
Scale it up or down-
LAYERS- Look at the right side of the screen you see that you have made different layers on a single document. Think of them like a bunch of pieces of paper on top of each other, you can even shuffle them around.
Photoshop files are like Onions.
Choose the text tool, click on your document and type something- experiment with it. At the top there are several choices for your text such as Font, Size and Color. Your assignment is to make your own photo badge for taking pictures during class.
The requirements are:
4 inches wide by 3 inches high
Must have a photo of you at 300dpi(print quality)
Must say in legible text:
WHS (the school year you are in)
Digital Photography
Period (the period you are in)
Mr. Brown
Your First and Last name
